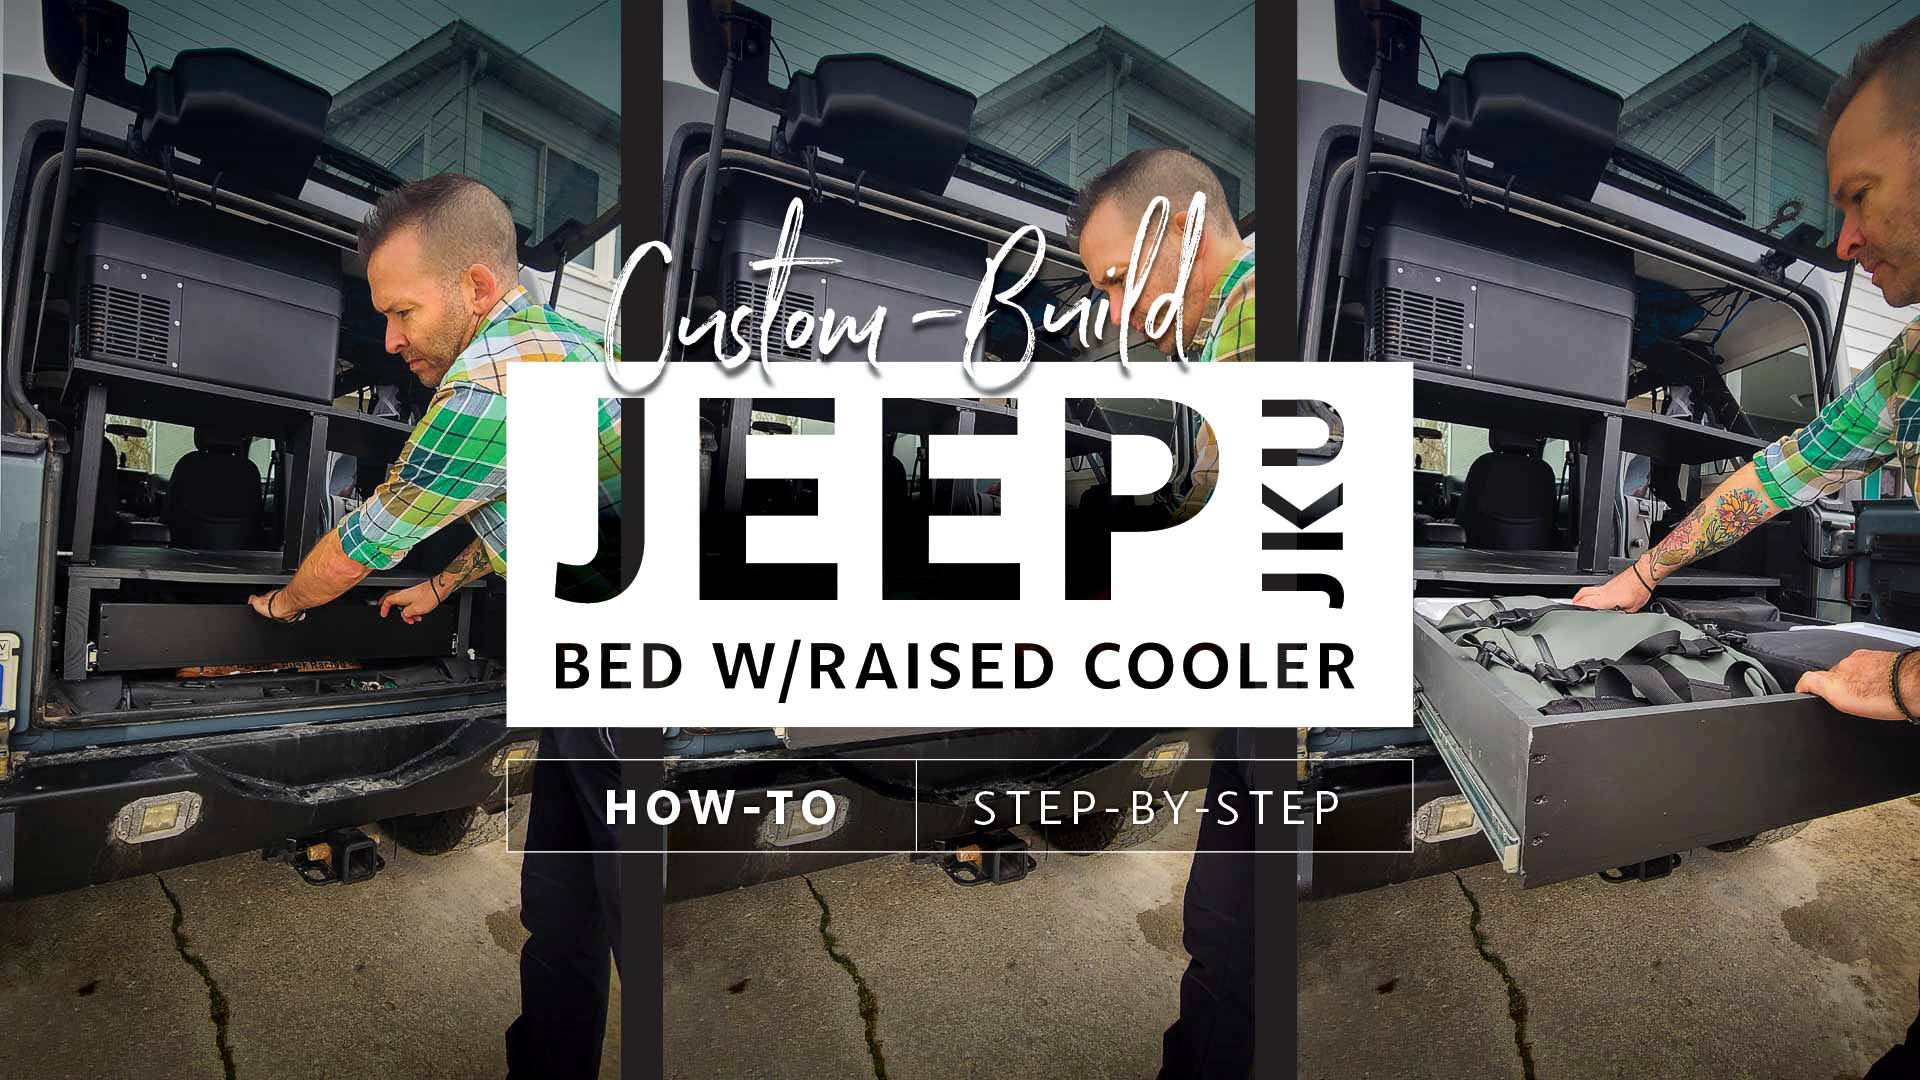
DIY Jeep Wrangler Bed: Sleeps 2 With An RV Cooler Shelf—How-To Build It
Sleep in A Jeep Wrangler — JKU Bed Platform That Sleeps 2 Build Details
After running my original Jeep Wrangler JKU Bed & Storage Platform for a couple of years I had learned a lot. I spent well over 100 nights in that one (click here to see that version), understanding what was working and what wasn’t. Then I built another version that only slept 1 person, but was much improved. You can see that Jeep bed build here, with tons of details.
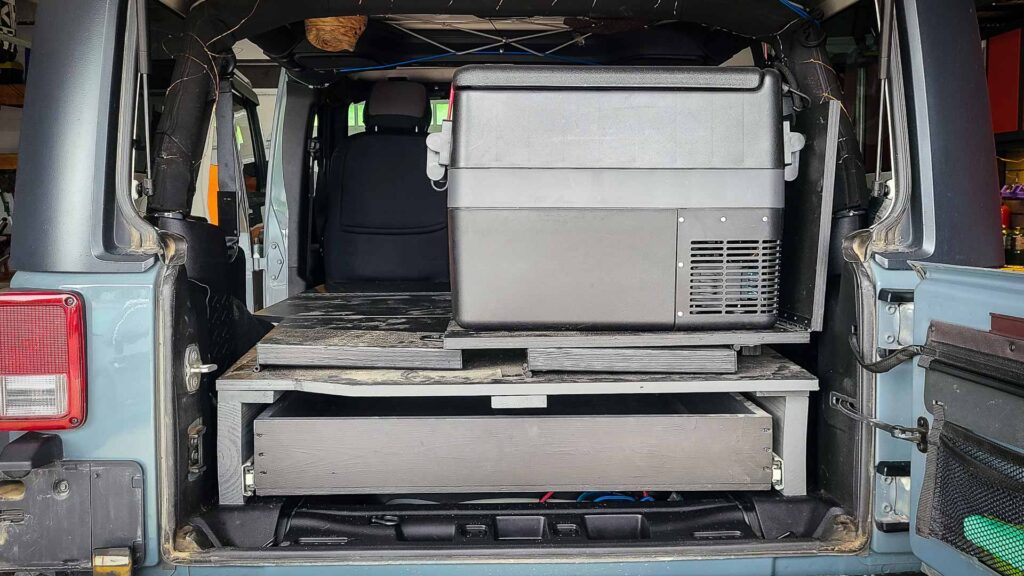
Times change, and I eventually needed to sleep two people in my Jeep, so I set out on designing a new bed that did just that. The kicker is that now since being diagnosed with Type 1 diabetes, I really need an RV cooler plugged in at all times to keep insulin cold. So how do you go about sleeping two people in a Jeep, with gear, and a bulky RV fridge?
Spoiler: This Jeep Unlimited bed platform is great with or without the cooler shelf, so if you don’t need it, just leave it out!
This site participates in the Amazon Services LLC Associates Program and other affiliate programs and may earn from qualifying purchases. You’re never charged more, but it helps out little by little! Check out “Privacy” in the top menu if you need to know more!
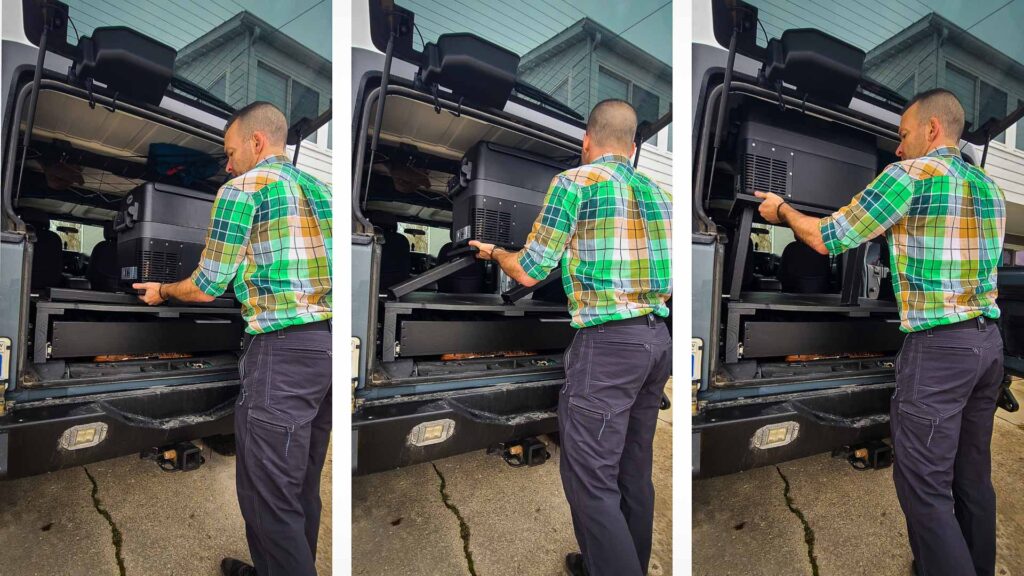
My solution was to use the height into the ceiling of the back of my hard top to “hide” the cooler away for sleeping. A working prototype or two later, and it worked! So check out the pictures and details and take what you will for your design. And make sure you check out some of my go-to Jeep after market parts here.
NOTE: This how-to is for reference only! Measure your Jeep multiple times and design to your own situation and details!
Time: +/-16-20 Hours
Estimated research, planning, constructing, and painting time for this Jeep Wrangler JKU bed storage platform. Should go faster with more hands & this article!
Materials Cost: +/- $250
Obviously cost for the build will change depending on what you have on hand or tools you might need to buy. Also, wood cost was really high when I was doing this bed build!
Parts & Materials
| Parts & Materials | QTY | Purchase Links | Notes |
| Piano Hinge 48″ (Bronze) | 2 | Amazon | Could use 36″ |
| Heavy Duty Drawer Slides | set (2) | Amazon | I used 32″ |
| Black V-Ring Tie-Downs | set (8) | Amazon | I used 8 total |
| Wood Glue | 1 | Amazon | |
| 4’x8′ 3/4″ Birch Plywood | 1 | Sleeping platform & raised platform top | |
| 2″x8″x10′ | 1 | May need 12′ depending on your setup | |
| 1″x5″x8′ finished boards | 2 | Drawer sides, bed subsurface support | |
| 1″x4″x8′ | 2 | bed subsurface support | |
| 4’x4′ 1/2″ plywood | 1 | Drawer bottom | |
| Door hinges | 6 | Amazon | Or find your own style |
| Small dowels | 4+ | Amazon | Use 4 minimum |
| Paint | 1g | Low VOC! |
Tools You Might Need
| Tools | QTY | Purchase Links |
| Jigsaw | 1 | Amazon |
| Jigsaw Blades | 1 | Amazon |
| Circular Saw | 1 | Amazon |
| Cordless Drill | 1 | Amazon |
| Drill Bit Set | 1 | Amazon |
| Paint Brushes | 1 | Amazon |
| Sand Paper Variety | Amazon | |
| 12″ Combination Square | 1 | Amazon |
Planning & design considerations for your Jeep Wrangler JKU bed platform
Like I said, this build took into consideration a lot of things about how I used my first Jeep storage & bed platform build and how I planned to use this new one. Here are some details and reasons I did what I did. I highly suggest thinking deeply about these and expanding on these ideas so you can adjust for your own use case!
How I use and move around in the space
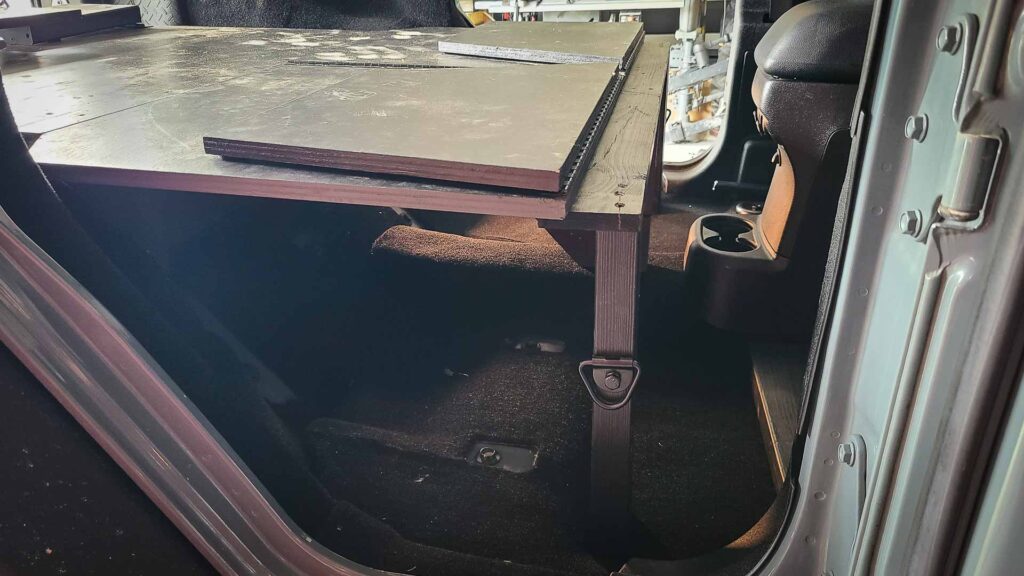
Since this bed platform has a fairly unobstructed flat sleeping surface, there’s not much in the way moving around the main space. You can even access the under bed storage by lifting one “wing” at a time when inside.
Actual sleeping & space needs
To sleep in a Jeep, with two people nonetheless, it tight and cramped. Imagine a proper 2-person tent; not a ton of room, but it does the job. If you’ve never done it, I suggest looking close at the measures here and testing with your partner in a tent before assuming this bed platform or sleeping in a Jeep is right for you!
Access to cupholders & console in back
Contouring the part of bed top I call the “wings” around the center console and cupholders essentially dictated the size of panels. You can adjust or make sexier curved cuts if you want, but I went with simple, straight cuts to save time.
Height of the bed & depth of the custom drawer
Note that the depth of the drawer in the Jeep storage space is based on my computer backpack which is about 5″ or so inches deep when loaded. For me that works, but you could adjust the measures more or less based on your needs.
Cooler & storage placement
This design puts the cooler on the back shelf, then up into the roof space when not being used, so it’s pretty much out of the way. And when driving the shelf is dropped and should be secured with a bungie or two to make sure things aren’t moving in transit anyways.
Quick access to driver’s seat
Getting back and forth from the front seat without getting out of the Jeep is not only a convenience but a safety issue. No worries with this build, since access to the front seats is easy: Just flip back the part of the “wings” at the head, slide seats back, and hop up front!
Other Gear & Accessories On/In My Jeep Wrangler JKU
| Things & Stuff… | Purchase Links | Notes |
| Bungie Nets – Attic Storage | Amazon | Not mine, but these look better sized |
| Thermarest Insulated Sleeping Pad | Amazon | Warmest pads I’ve ever used! |
| Powerlix Ultralight Sleeping Pad | Amazon | Thin, but good backup/extra pad |
| Goal Zero Yeti | Amazon | See Full DIY How To Article Here |
| Heatshield Custom Fit Windshield Shade | Amazon | Custom fit—so worth the money |
| Coverking Custom Fit Seat Covers | Amazon | 6+ years running now… |
| Ammo Field Box | Amazon | Spare gear/parts storage |
| Thule Gutter Foot Pack | Amazon | |
| Thule Square Load Bars 60″ | Amazon | |
| Thule Force XT Cargo Box | Amazon | |
| Thule One-Lock Cylinders | Amazon | Worth it for a single-key system |
| Tuffy Metal Under-Seat Lock Box | Amazon | LOVE these heavy-duty lockboxes |
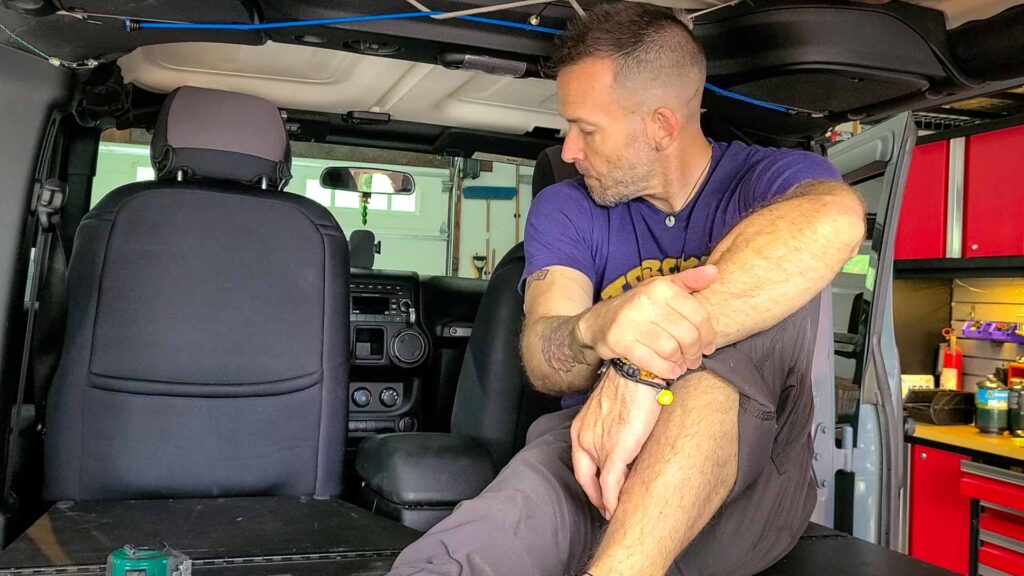
Locked storage – storage drawer & under seat lock-box
With the Jeep tailgate closed and locked, the 32″ drawer is really hard to get to, even with the back of the drawer cabinet not having an actual back. Not impossible, but at least it makes it one of the most secure places for valuables.
But my Tuffy lock boxes under my front seat (below) serve for true locked storage for money and other stuff, and I highly recommend them!
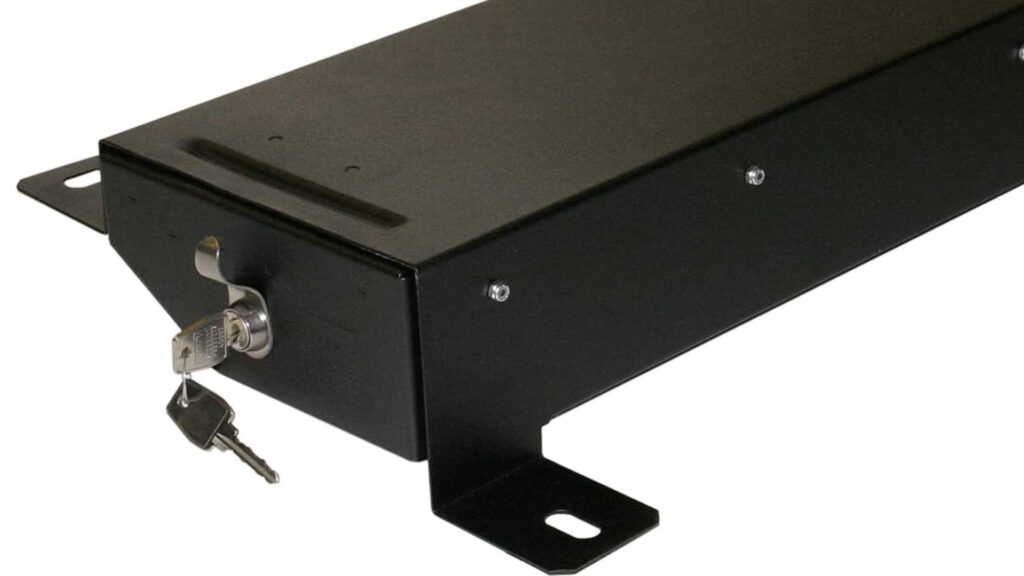
Under-Seat Heavy Security Lockbox
Especially when I was running a soft top, but now still with a hardtop, I’ve sworn by Tuffy’s products. This lockbox is robust and bolts into the frame under the seat. You can get one for the passenger side too. (Used to run their trunk storage box back in the day.)
READ NEXT:
Jeep Wrangler Upgrades & Accessories to Make Your Jeep Life Fun as Hell!
Is Life An Adventure Anymore? Reflections from Camping in Cathedral Valley in Capitol Reef National Park
General dimensions used: Jeep Wrangler JKU bed storage platform
I’m giving you general Jeep bed measurements I used for my custom build here, so this how-to is for reference only! Measure your Jeep Wrangler multiple times and build to your own variables between year and make and any aftermarket Jeep accessories and parts you might have. Mine is a 2015 Wrangler JKU Sport.
Main sleeping platform dimensions:
52″ wide & +/-71″ long, wider at the doors and narrower at the Jeep tailgate
Hinged RV cooler shelf:
39″ wide & 14″ deep, with about 13.5″ underneath when extended up on its legs
Drawer storage:
Actual drawer is +/-5″ deep but had room above inside the enclosure to give around 6″+
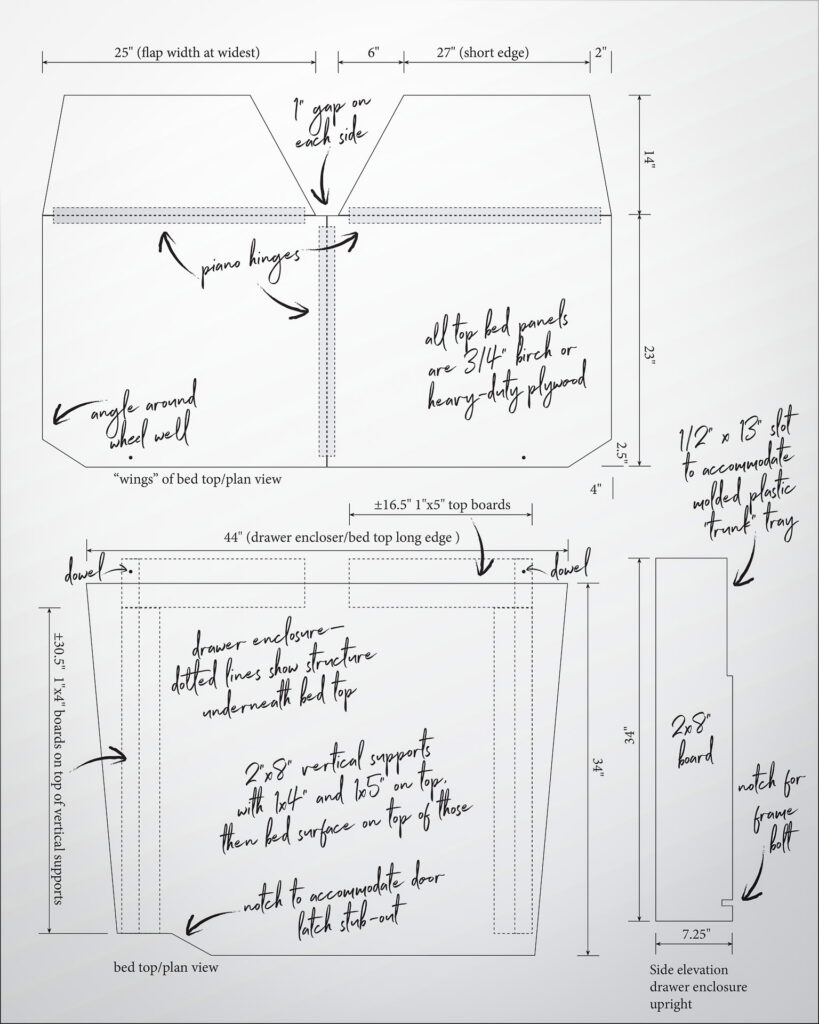
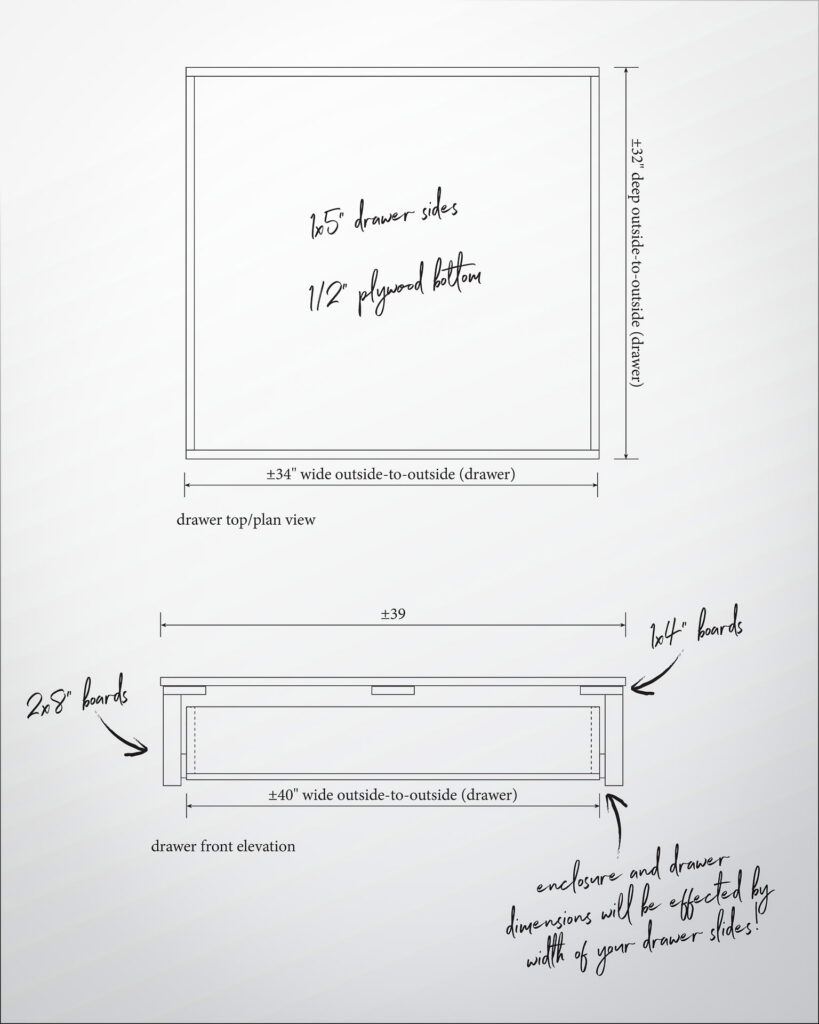
Before you start building your bed platform
Some things to keep in mind before and during the actual build. Oh, and I suggest reading this article a few times with your own pen and paper and tape measure to adjust before even buying materials or starting your build!
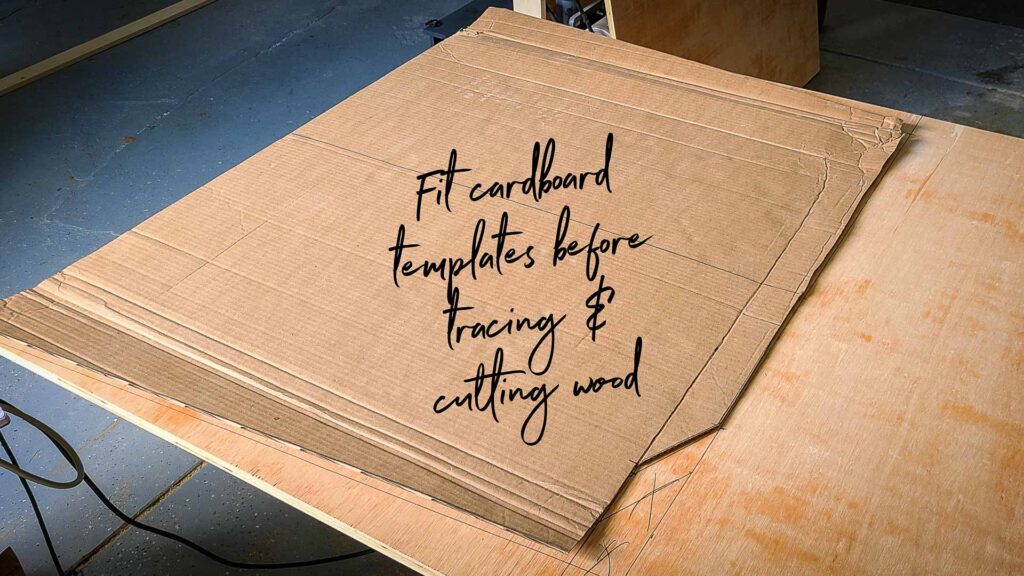
Cardboard cutout templates for the win!
Find some big cardboard pieces. You can likely ask an appliance store if you don’t have any. It’s a huge time and money saver assuming it saves you from wasting expensive wood.
Plus, being able to “see” the bed platform before cutting and being able to use your template for general tracing on the wood is really helpful. (Just make sure you use a straight edge for true lines.)
Build the Jeep bed from the bottom up and adjust measures as you go
Start with the spine, then the storage drawer and drawer enclosure, then tops and wings, and finally the cooler shelf. Raise up the upper piece to fit it. Build all that then confirm the upper storage box before cutting, etc.
Adjust angles for Jeep body, etc.
Pay attention to the tailgate latch enclosure, driver seat position, window crank accessibility, cupholders, and any other nuances your Jeep might have.
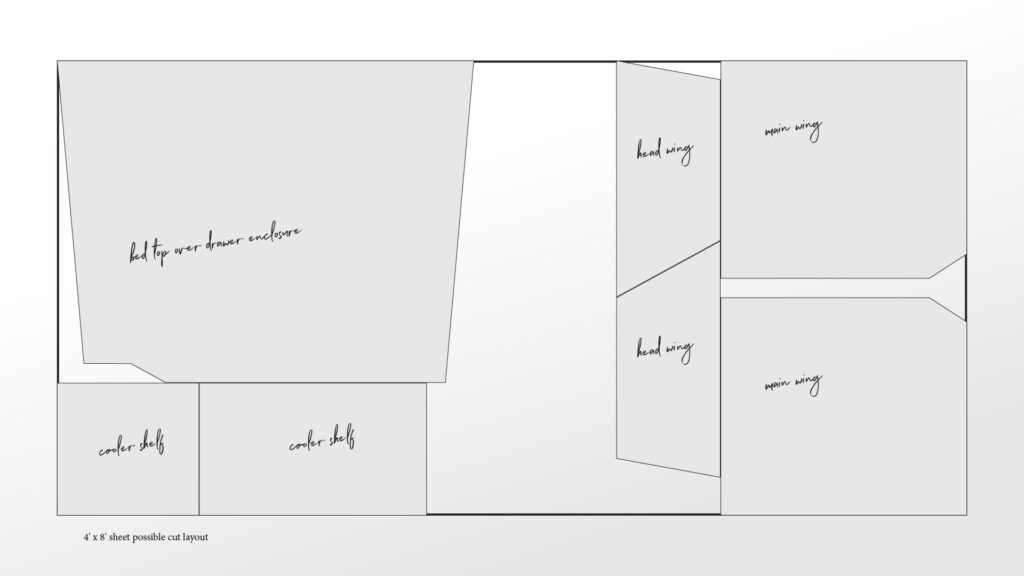
Plan your cut pattern on your 4’x8′ heavy plywood!
You can likely get all of your bed top pieces and the shelf out of one single sheet of 4’x8′ heavy-duty plywood if you plan well. And I suggest using the factory straight edge to your advantage whenever possible knowing those edges are already true and straight.
You can do this with a circular saw (I suggest using a guide to get straighter cuts) but I highly suggest a proper table saw and a new blade for the easiest, best and straightest cuts.
Cardboard cutout templates for the win!
Find some big cardboard pieces—you can likely ask an appliance store if you don’t have any. It’s a huge time and money saver assuming it saves you from wasting expensive wood. Plus, being able to “see” the bed platform before cutting and being able to use your template for general tracing on the wood is really helpful. (Just make sure you use a straight edge for true lines.)
Heavy Duty Cargo Tie Downs
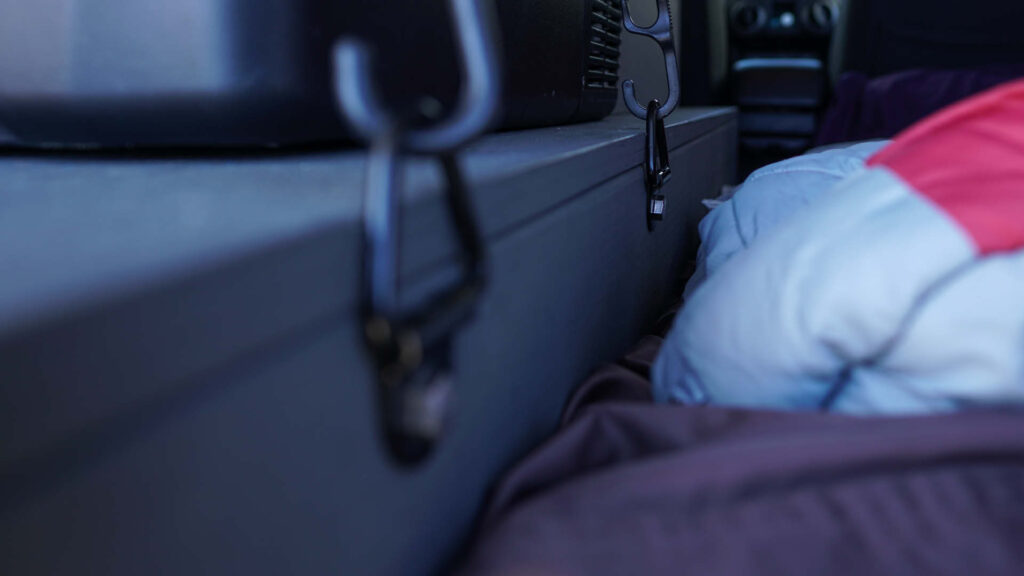
I love these tie down anchors and I use them everywhere in Jeep my bed builds. For less than $2 a piece, they’re good in the Jeep, workshop, or wherever else you need strong tie downs for bungies or ropes.
How-to: Jeep prep, removing the seats, pre-measures, etc
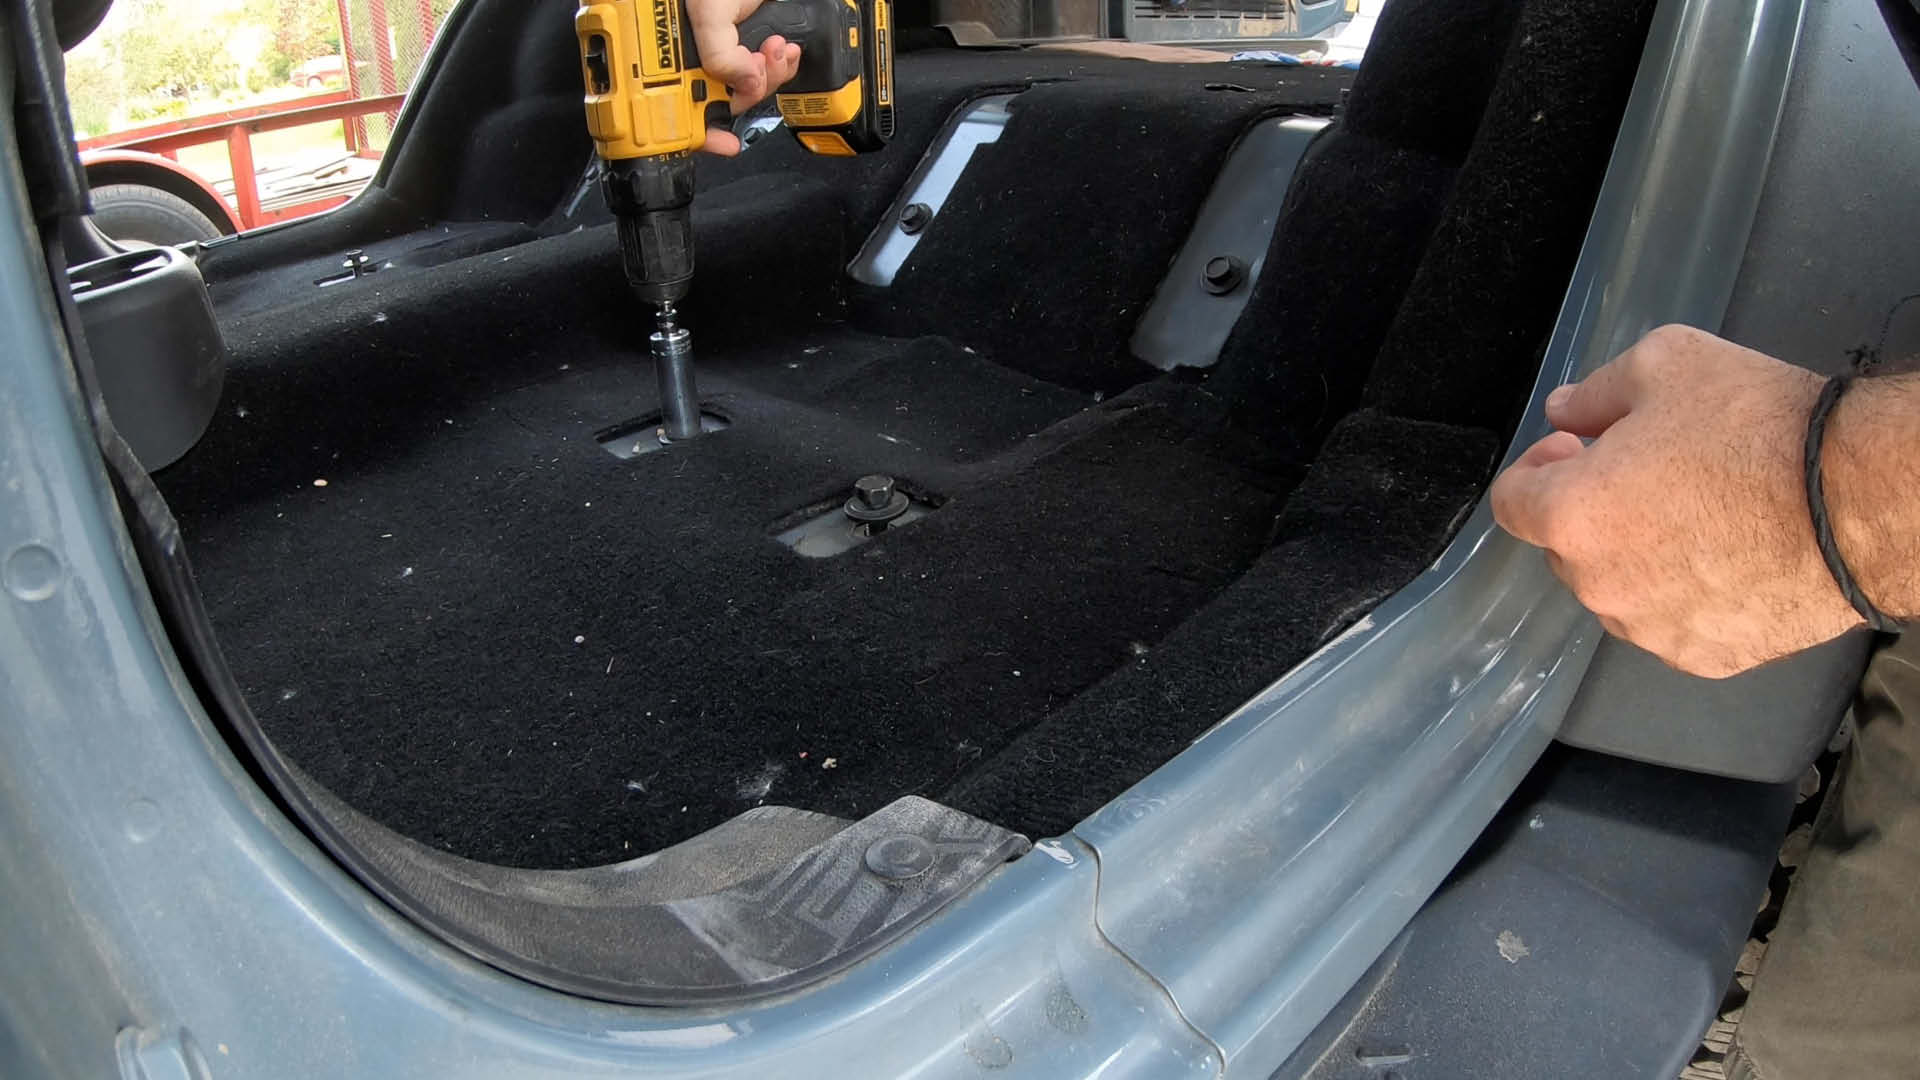
Step 1. Remove the back seats and cover for the original equipment jack stand and storage compartment. Removing seats for the first time can be a major pain, but once you break the Loctite it’s a breeze. Get yourself a long lever or proper breaker bar to put over your wrench/socket handle to give you some leverage.
Step 2. Using the general measures from all of these DIY instructions and images, grab a tape measure and detail on a sheet of paper and detail what your specific bed measures need to be. Keep in mind window cranks, center consoles, extra speakers, seat positions, etc.
Step 3. Using the 48″ T-square, transfer your measures to large pieces of cardboard to use for templates. Even if your Jeep Wrangler JKU make and model match my 2015, I suggest doing cardboard cutouts so you can “see” how things will fit before building!
Once you cut templates out you can add too or take away material to get your fits just right. My final pieces looked like a cardboard Frankenstein’s monster because I had cut and added to them.
How-to: The Jeep Bed Spine & Bed Supports
Step 4. Measure and confirm the size and placement of the spine support of your Jeep bed platform. Don’t worry, you’ll confirm things next without cutting much.
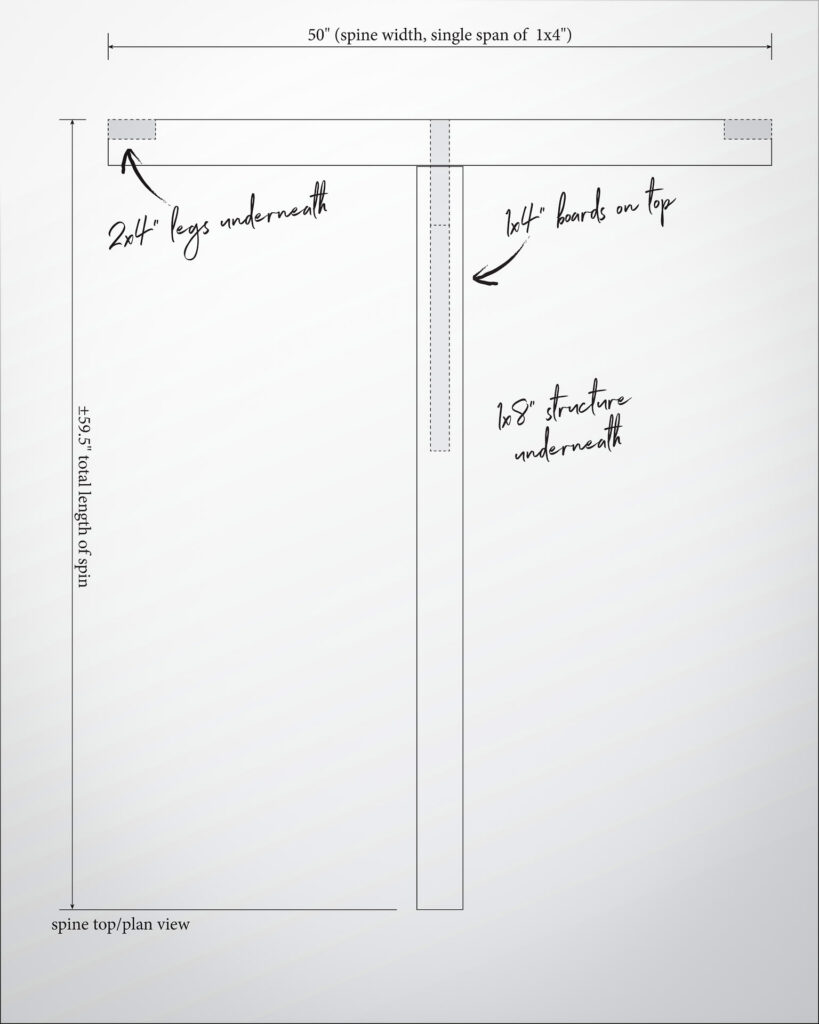
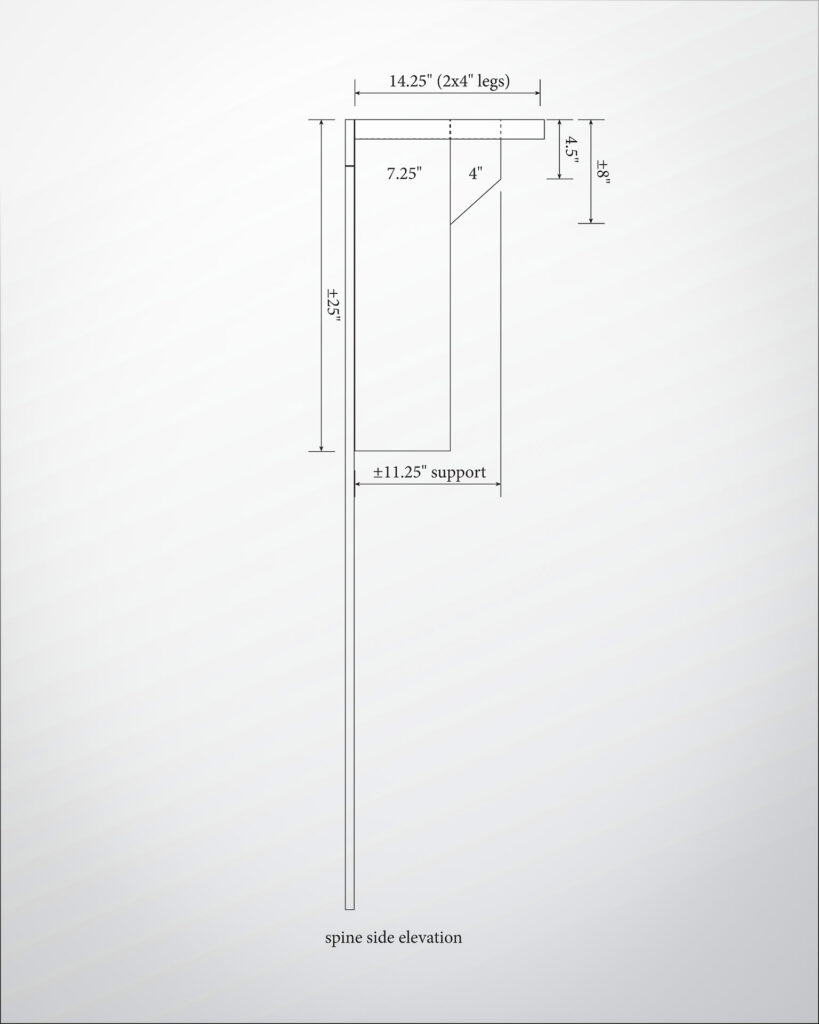
Step 5. Soft-assemble to confirm size, height, etc., that will give you other measures. Cut your 2″x4″ spine legs and simply place in the jeep and set on of the 1″x4″ boards extending out the doors if you want, until you confirm measures. You can then place the other 1″x4″ on top going out the back of the jeep and simply prop that up to height.
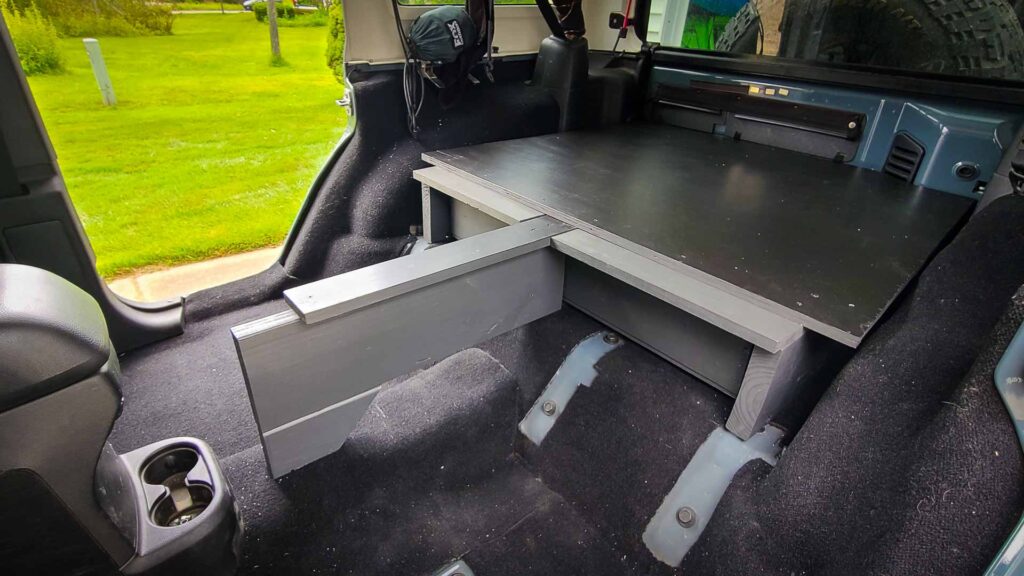
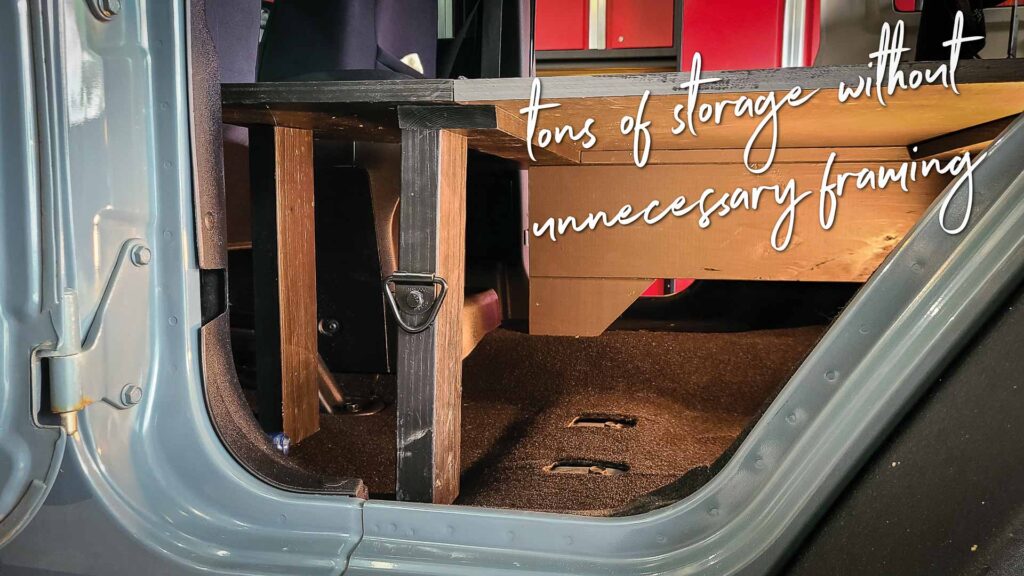
Step 6. Confirm measures for the 2″x8″ main spine support pieces that go over the body floor articulations. Note in the image below that the main 2″x8″ sits on the frame in the back, and it only needs the small supplemental foot piece to raise it up to be level. I suggest you wait to cut and assemble this until you get through step 9 below.
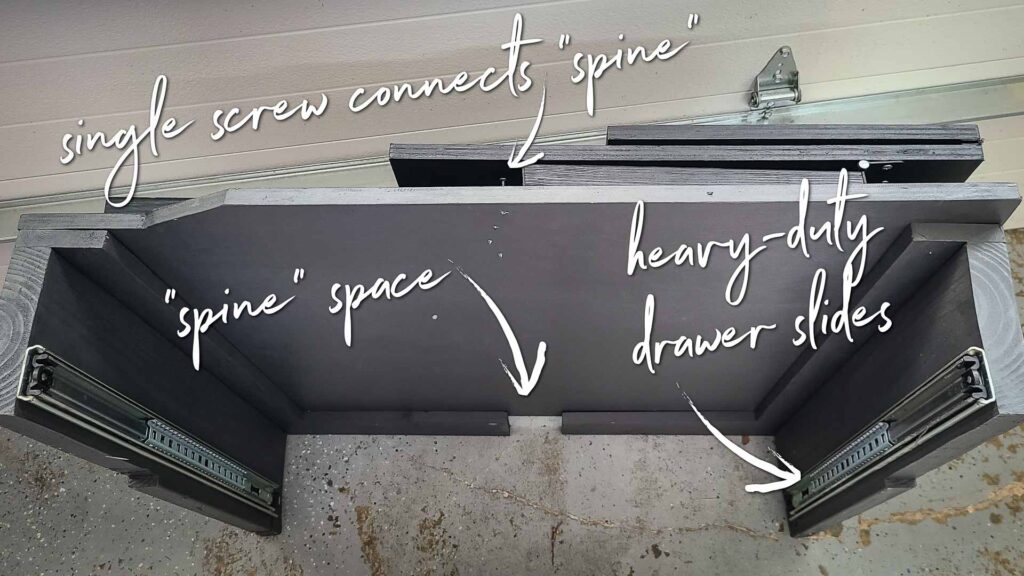
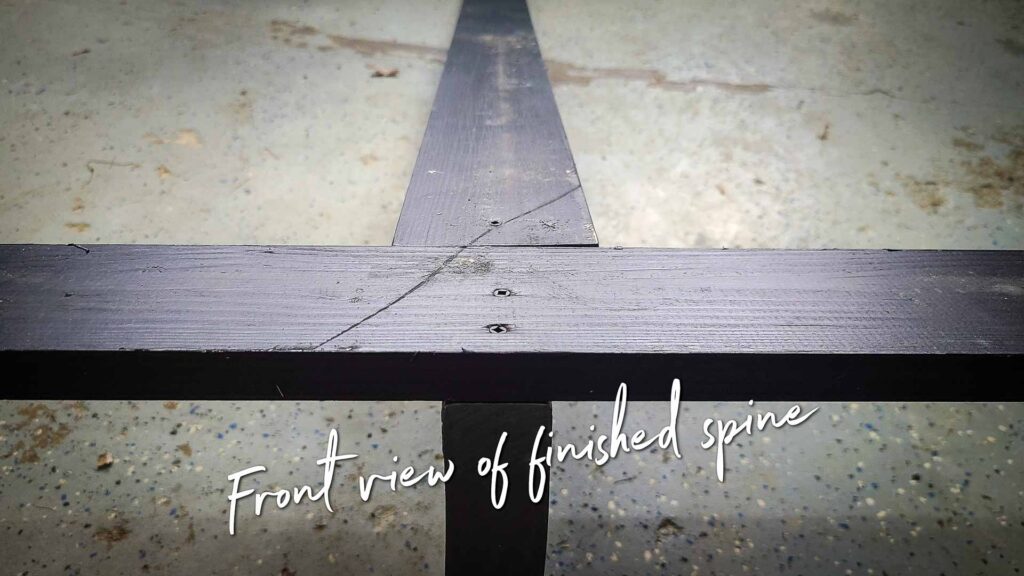
How-to: Constructing the raised storage platform / drawer enclosure sides
Step 7. Before cutting and constructing the whole spine, cut and sort the 2″x8″ uprights that make the drawer enclosure. This is simple, since the only thing necessary is cutting to length (go longer than shorter if necessary), measuring notches and cutouts, then setting them in.
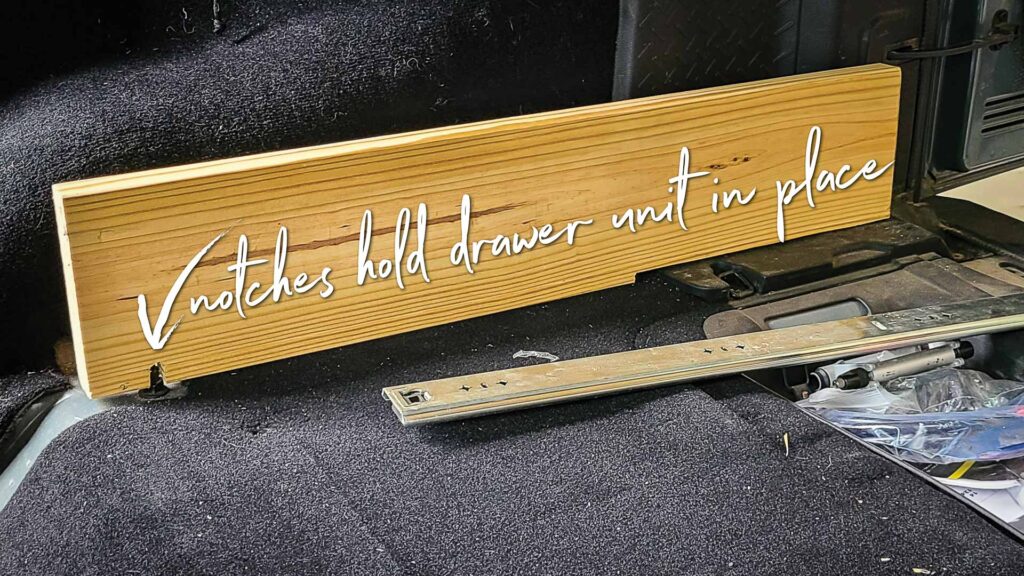
NOTE: The backmost edge of these uprights are based on the tailgate door latch enclosure. Look close at the plan drawings to see how those things line up!
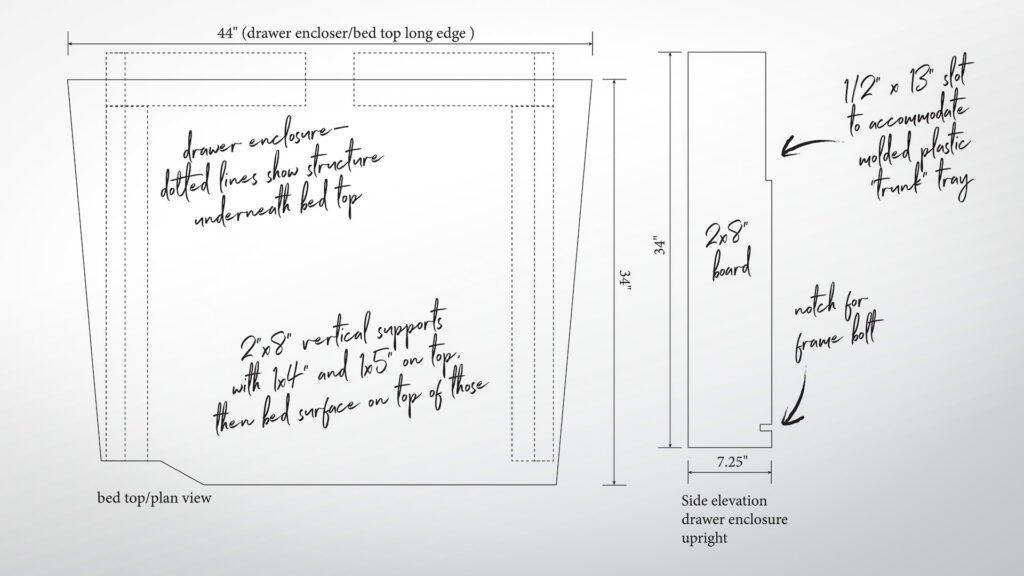
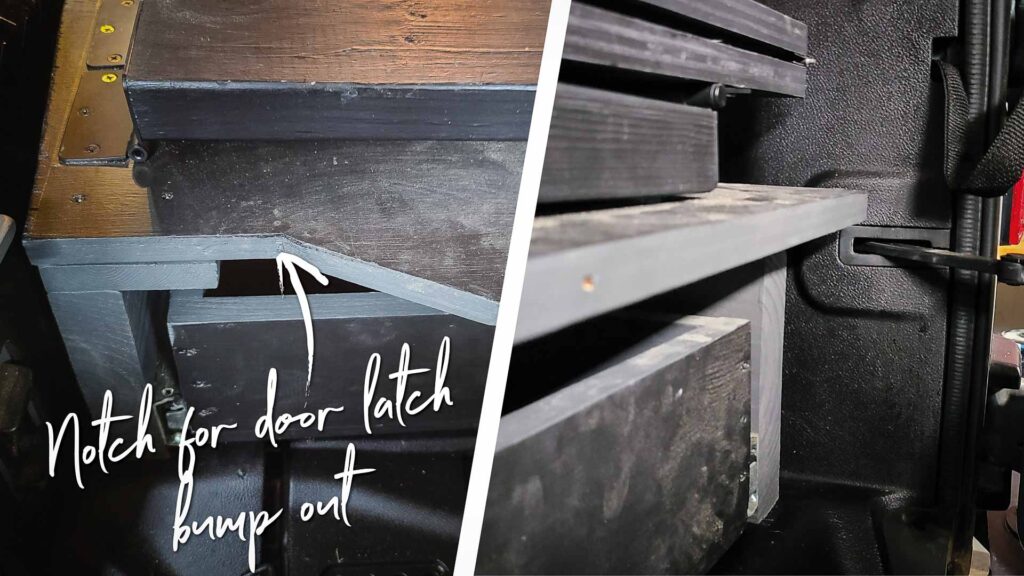
Step 8. Cut a template for the bed top that goes on the enclosure based on the measure images. Don’t forget that there will be pieces of 1″x4″ on top of the enclosure legs that help to add some surface area for the top and wings to sit on.
At this point, the back of the spine near the tailgate is simply propped up by something (a spare 2″x4″ piece?) so you can see things lining up, test the side locations, etc.
Step 9: Dry set up the central spine, drawer uprights and bed top. This step is really just so that you can really confirm that things are level and your measures are correct before cutting and putting together your spine and the remaining pieces. Make sure the enclosure legs fit night and from front-to-back your drawer has equal room top to bottom.
Now you can likely complete your central spine build and add the 1″x4″ and 1″x6″ top boards to the enclosure verticals. Don’t worry, these get the bed top applied overtop, so if you have to affix then take apart and adjust, it’s not going to be visible.
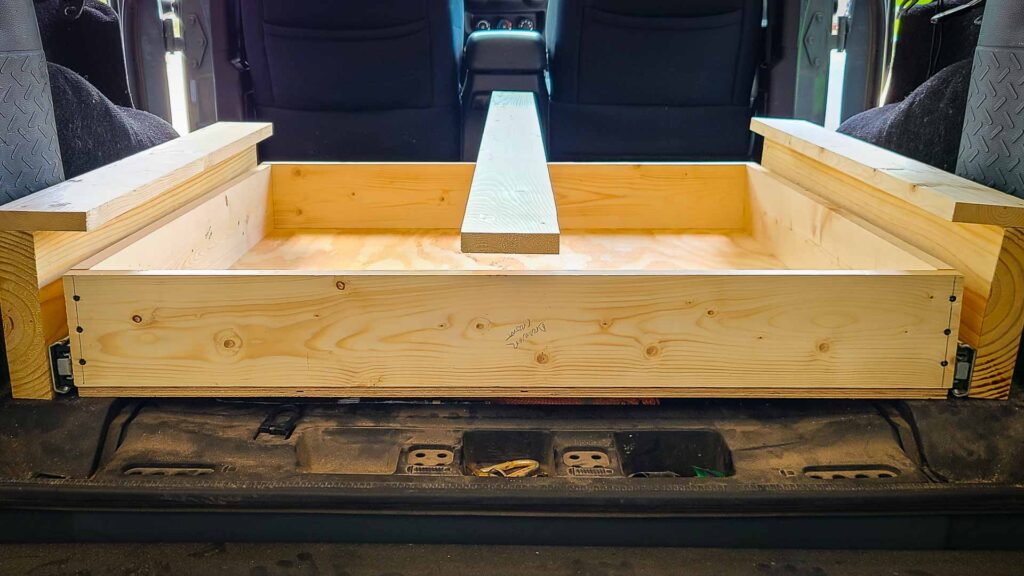
How-to: Constructing drawer enclosure & back bed top
At this point you’ve constructed the spine and have the storage box sides cut, notched, etc., applied the top boards to those uprights, and you have a template for the bed top. I suggest at this point finding a spare 2×4 or other spare boards to allow you to attach a front and back to the drawer enclosure sides just for the use of making it square while you finish installing the top.
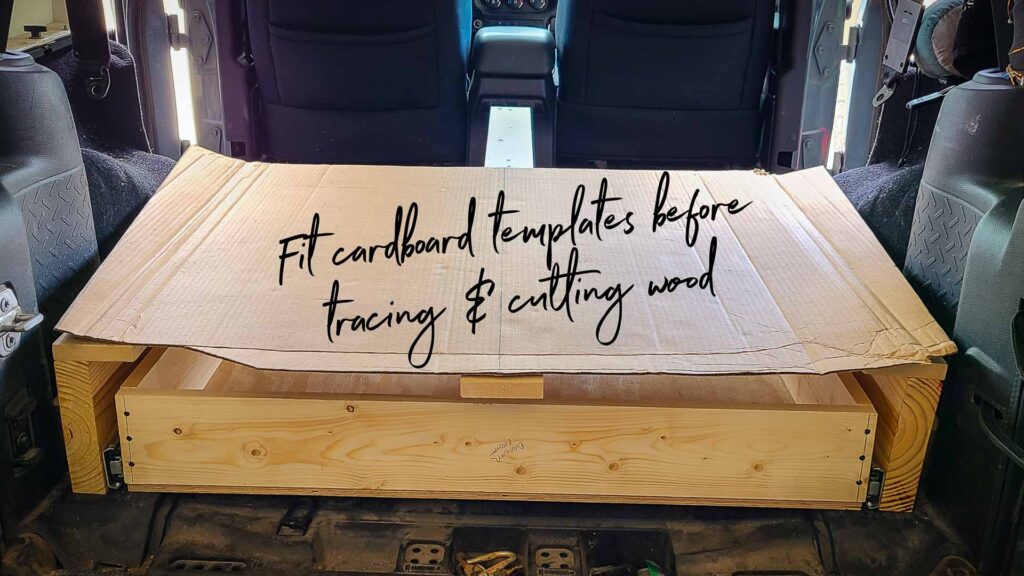
Step 10. Now place the enclosure exactly where it will live once all bed is built, make sure the side have equal and parallel side-to-side measures where your drawer will go later, and set your template on top. Near the passenger seat area you should have about 2.5″ or so of the 1″x5″ top boards showing, which your wings will sit on later. Make sure all of your measures are plumb and things are straight…
NOTE: You’ll want to close the tailgate with all of these parts sitting where you want them to make sure you have clearances!
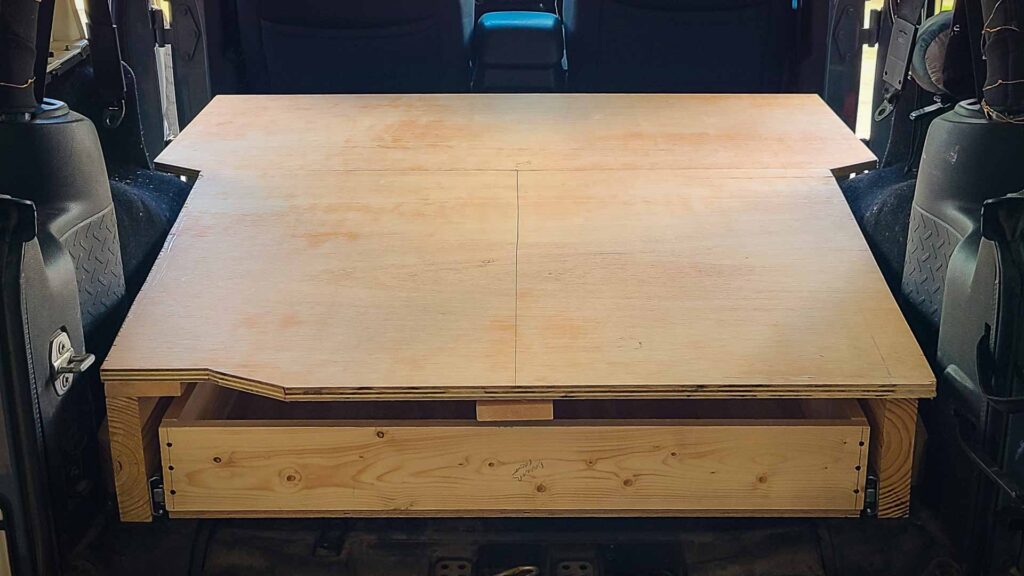
Step 11: Cut your heavy duty plywood for the drawer enclosure top. All of these checks and balances for measures have led to this—cutting the most expensive piece of material you’ve bought. If you’re confident in your template, place it with the middle of the bed edge against the perfectly cut edge of the sheet. Put your template on top, mark lightly, then come back with a straight edge to true your lines, then cut!
Step 12: Set your plywood on top, close the tailgate, true everything up, then connect with screws. If you’re unsure at this point, just add enough screws to hold things together and you can come back towards the end of the build (mainly after your drawer is in and done) and add more screws.

At this point you essentially have a finished back part of your bed, ready to build and install the drawer.
How-To: Constructing & installing the drawer
Step 13. Construct the drawer box. Make sure you take into consideration the material depth of the heavy-duty drawer slides and leave room for the tailgate latch enclosure. Your drawer slide width and any play in your slides will determine your drawer materials measures. I’ll leave those details up to you.
NOTE that you’ll want to leave about 1/2″ under the drawer so that it’s actually raised up off of your Jeep floor and you can put things in your OE “trunk” underneath.
For the drawer bottom, a 1/2″ thick standard plywood is likely enough, which is what I used. Construct the edges all together, cut your plywood to size, set on top and screw together.
Step 14. Paint your drawer before adding the heavy-duty drawer slides. Up until now I’ve avoided painting, but I’m a details guy. At this point I would suggest painting the whole box (and enclosure if you’re solid) before adding the slides so that you can have a super clean and tight paint job when you’re done, even behind the mechanical parts. Make sure you do any sanding of hard corners first if you want some fine details!

Step 15. Once your paint is dried, install the drawer slides and drawer. Honestly, installing drawer slides on drawers and the enclosure is hella tricky IMO. I suggest that if you’ve never done it, you just measure a lot, mark truly, and go at it, maybe securing minimal screws until you’re sure it’s set up right.
You can always undo and adjust to a degree or use shims if things aren’t aligning perfectly. Good luck!
How-to: Constructing the bed platform top “wings” sleeping surface
At this point you should have a finished back portion and the spine in place to where it’s some easy confirmation of the “wing” piece measures before cutting. Just remember that near the front seats the hinged part of the wings the fold forward will sit midline on the 1″x4″ spine tops for support. (Look closely at the black and white plan images…)
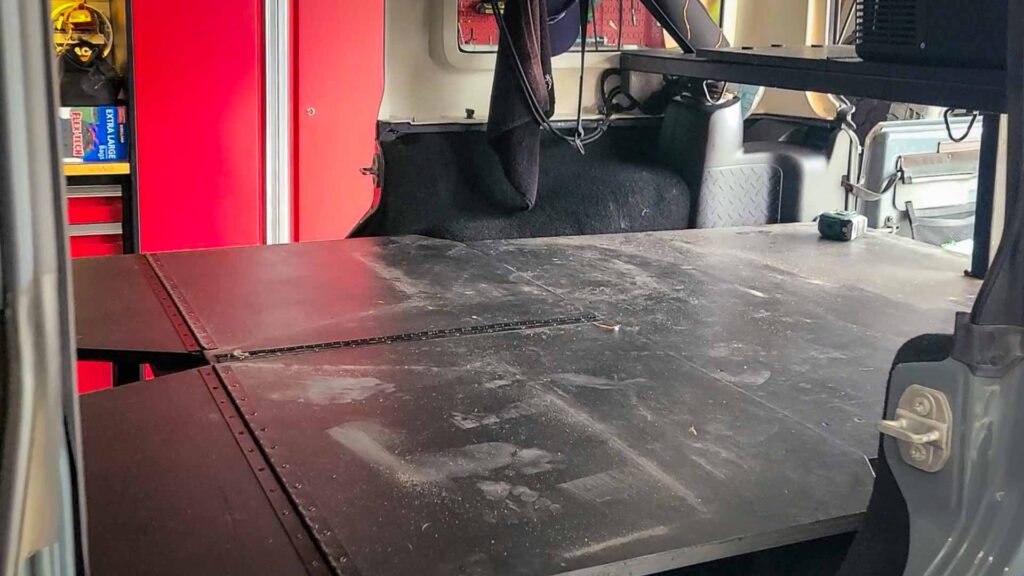
Step 16. Confirm your measures for the wood and lay out on your remaining heavy-duty plywood. Again, lay it out so that the edges that are already perfectly straight on the original 4’x8′ are used for edges that you need perfectly straight, like where they meet when bed is put together. Measure thrice, cut once!
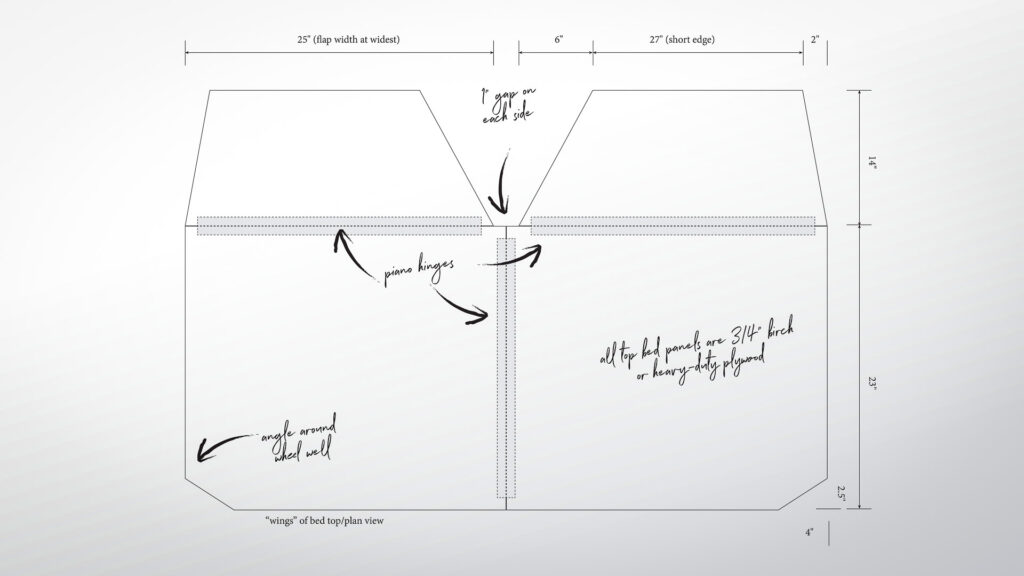
Step 17. Cut chamfered angled edges on the opposite side of the pieces where your hinges will go. You only need to make it about 1/2 width, but this will make sure things move smoothly when lifting and moving hinged pieces.
I suggest you actually hold off and cut the remaining pieces (for the shelf) and paint everything before actually assembling, but that’s up to you!
Step 18. Assemble the hinged pieces. Cut your hinged pieces to length then assemble. This is easy enough just laying all of the hinged pieces together on a flat surface, predrilling your holes first.
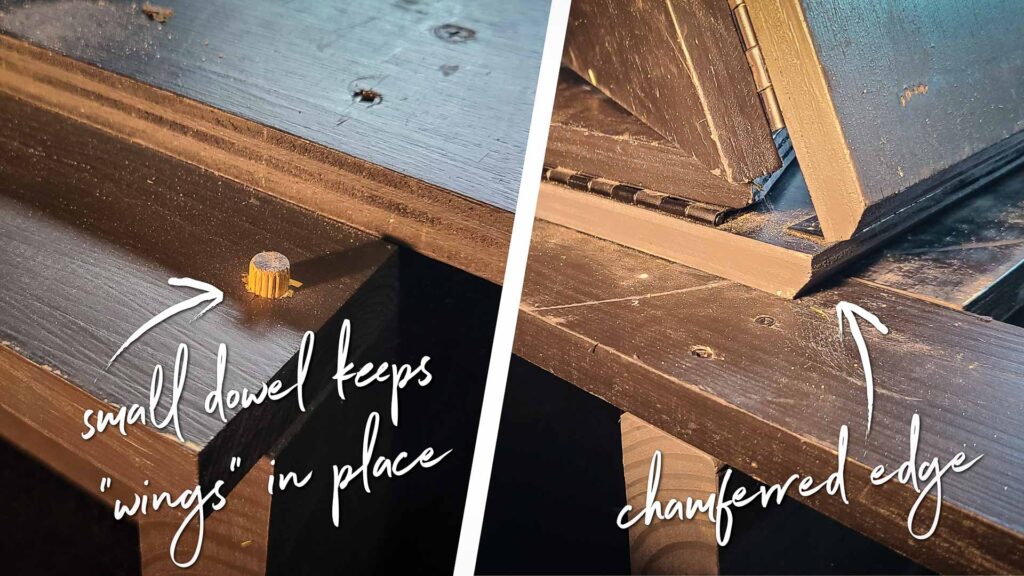
Step 19: Cut the vertical support legs for the “head” pieces of the wings. These are simple 2″x4″ pieces that will have a small dowel/hole on one end and they’ll just use gravity to stay in place. Easy peasy. I suggest thinking about what storage used the space around these might need and place them accordingly.
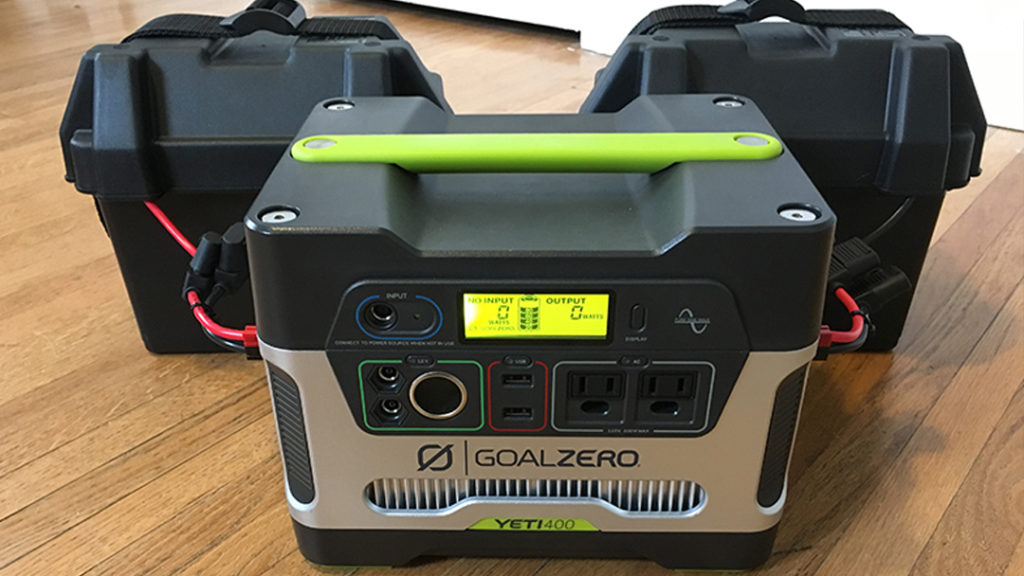
For instance, if you know you have a battery system like this one, place it in, then figure out where the best place for your legs will be. We’ll get to the dowels later.
How-To: The cooler shelf
Admittedly, the shelf is where you can likely improve on this design, but hey, my first try works pretty well. The hinged pieces simply use door hinges, since they fit pretty perfectly on the 1.5″ edge of a 2″x4″ or 2″x8″, which as you know are actually 1/2″ less than those measures. And the heavy duty nature of hinges like this had me feeling better than any piano hinges I found.
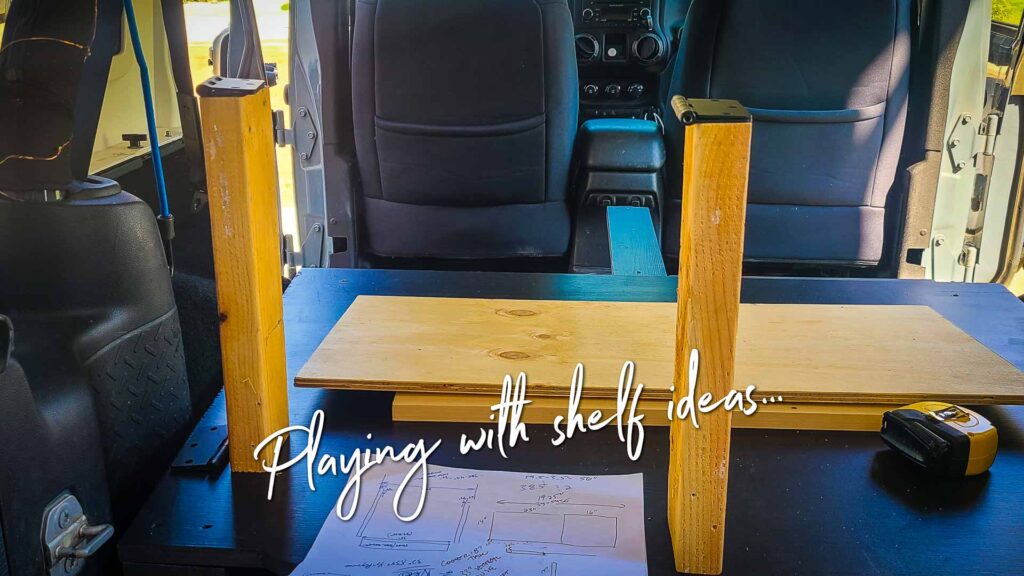
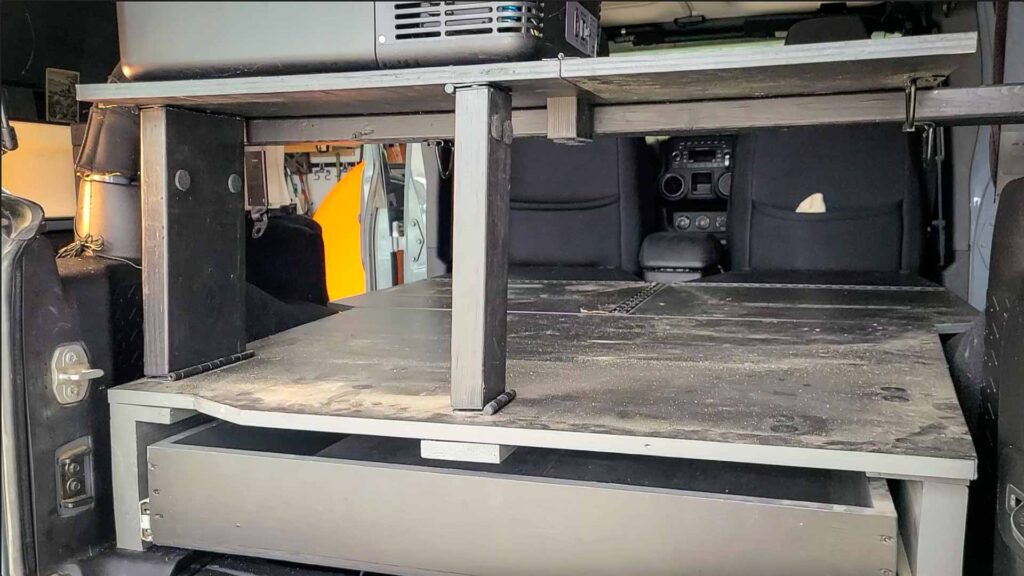
Where you can likely improve is either finding hinges that lie perfectly flat (so that the round part isn’t thicker than the hinges), or adding a 1/8″ shim on the side of each hinge that would allow them to sit perfectly flat when the shelf is up.
Step 19. Measure your space to make sure your cooler fits up in the ceiling of your Jeep when extended, then dry fit everything! The tops of your shelves are made of the heavy-duty plywood, so cut them after confirming measures, then just play builder and set everything up without connecting so that you’re sure you have it set up right. Paint and assemble when you’re confident!
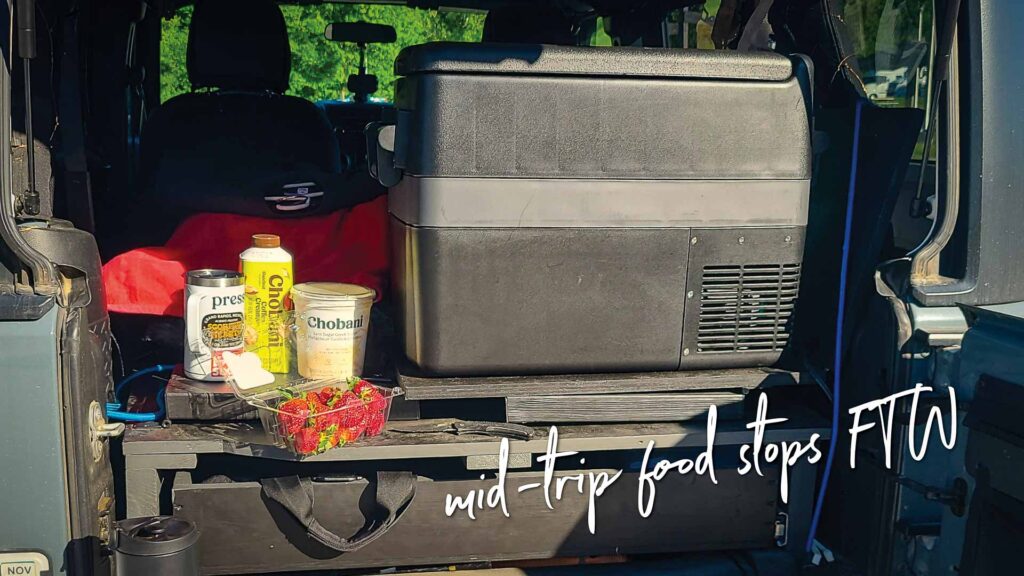
The hinge mechanisms are a little tricky to visualize, so much better to play with them before connecting everything.
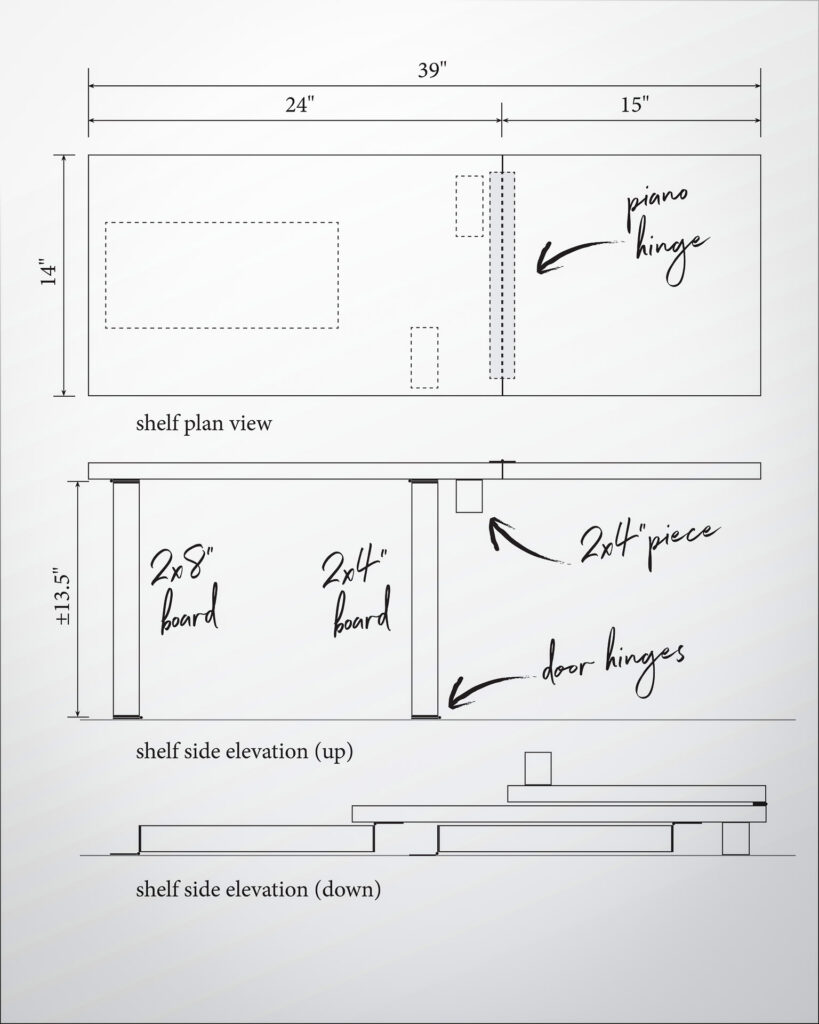
Finishing Touches: Dowels, tie-downs, and shelf support
A few finishing touches are up to you, but I think this is where the extra touches can really elevate things. And this is your bedroom, so make it nice!
Adding dowels
Add small dowels to the corners of the wings where they sit against the drawer bed top. This is simple if you just put it all together and use a tiny drill bit straight through the top into the structure underneath. Then take them out and measure dowel depth, drill, use wood glue on the dowel side, finito.
Don’t forget you’ll also need these in your leg supports. A single dowel piece go in end of each 2″x4″ and the receiver hole goes on the bottom of those wing pieces.

Adding tie-downs
Add tie-downs here, there, and everywhere! These tie-down’s are cheap and useful for so many things, so I buy a multi-pack and go nuts on every new build. You’ll definitely want some around the cooler shelf for when a cooler is in tow or just to hold the shelf down when not in use. Other spots I have them are on the spine legs.

Cooler shelf support “bar”
For the cooler shelf support (when up) I used a 2″x4″ and created a horizontal “bar” that I simply wedge under the shelf. This works fine, but you can likely improve on it. I have a hard top, so there are some slim “lips” on the sides that I sit this bar on.
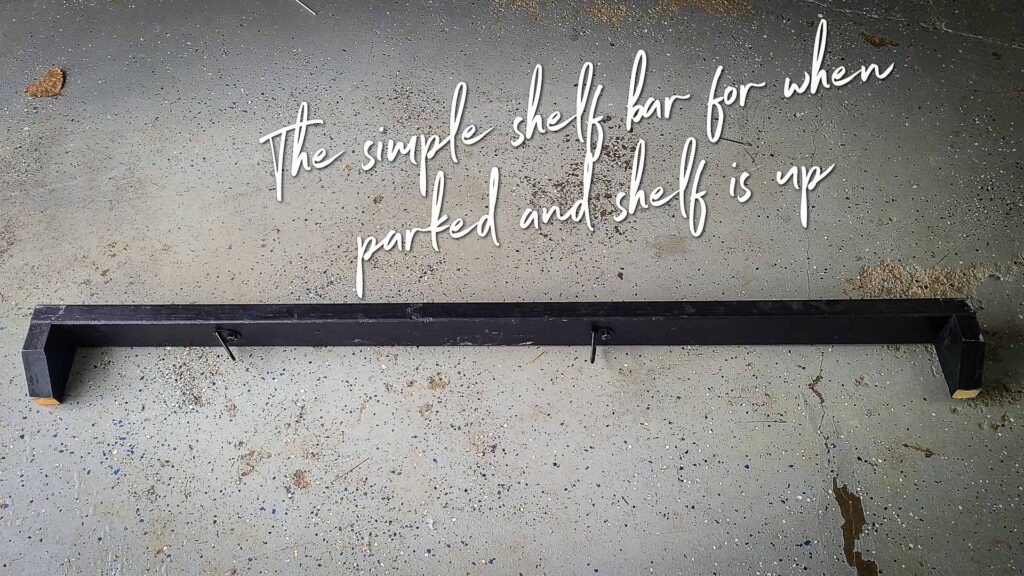
It’s not sexy, but it’s only meant to keep the shelf up when parked and I would never leave the shelf up when driving!
The Final Step & Wrapping up
What’s the final step? Grab a beer and enjoy your work!
I’m really happy with this build, even though there are always improvements I see after the build is done. I hope that’s where you’ll take these ideas and run with them!
Where this Jeep bed excels is in the lack of wasted space because of the minimal structure. So much storage which leaves all that space on the bed to sleep two comfortably.
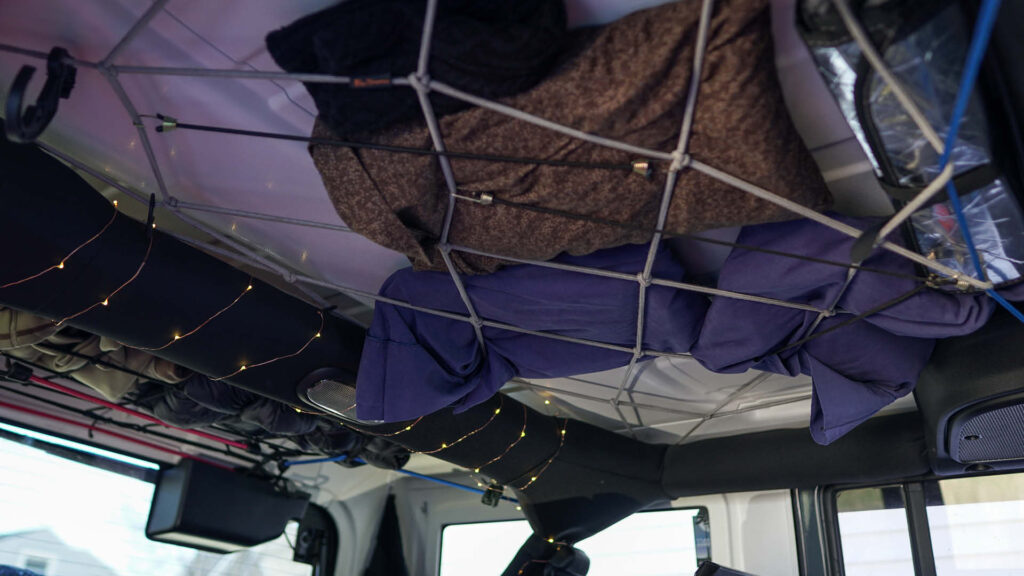
Things I need while in the Jeep are easy for me to get to, especially in the “attic storage” bungee net system rigged up. (Images below)
The metal tie-downs are inexpensive and really helpful. I was worried about the metal tie-downs jingling or making noise, but that’s never been an issue.
The secure drawer storage makes me feel safe when around town, but again, I keep the really important stuff locked in a Tuffy lockbox under my front seats. Highly recommend. I’ve had a version of this box in both of my Jeeps, so for about 15 years now.
Let me know in the comments if you build this and whether you make any changes or modifications! I’m just a hack with some power tools, and I know there are better ways to do things than the way I do ’em’!
Other Gear & Accessories Seen On/In My Jeep Wrangler JKU
| Things & Stuff… | Purchase Links | Notes |
| Bungie Nets – Attic Storage | Amazon | Not mine, but these look better sized |
| Thermarest Insulated Sleeping Pad | Amazon | Warmest pads I’ve ever used! |
| Powerlix Ultralight Sleeping Pad | Amazon | Thin, but good backup/extra pad |
| Goal Zero Yeti | Amazon | See Full DIY How To Article Here |
| Heatshield Custom Fit Windshield Shade | Amazon | Custom fit—so worth the money |
| Coverking Custom Fit Seat Covers | Amazon | 6+ years running now… |
| Ammo Field Box | Amazon | Spare gear/parts storage |
| Thule Gutter Foot Pack | Amazon | |
| Thule Square Load Bars 60″ | Amazon | |
| Thule Force XT Cargo Box | Amazon | |
| Thule One-Lock Cylinders | Amazon | Worth it for a single-key system |
| Tuffy Metal Under-Seat Lock Box | Amazon | LOVE these heavy-duty lockboxes |
Make sure you’re using these just as recommendations and fit your specific vehicle and needs to find what’s right for you!
Cheers!
— Jason
Connect & Share This Article
Travel Planning Tips
Figure out where you are going & how are you getting there…
I suggest using at least 2 to 3 different travel search sites. Start with Skyscanner or Orbitz or Booking …or whatever aggregator site you prefer. Then when you see what airlines to use, check their respective sites for better deals or rewards flights.
Figure out where you’re going to stay…
If you’re interested in hostels, search Hostelworld or Hostelling International. For longer-term or more private digs, look at Airbnb, VRBO, or you can look for hotel rooms in the links from the search engines listed above.
Get comprehensive travel insurance, or in the least, travel medical insurance if internationally…
Especially with Covid not going anywhere, get covered. Start with an insurance aggregator like Insure My Trip, or with SafetyWing, World Nomads, or another. Then decide what is important to you; trip cancellation, baggage coverage, medical, or all of the above. And get a yearly evacuation plan, since you’ll have to get home after your emergency!
Need more resources? Click here!


